How to Cure Live Rock for Live Coral Reef Tank Aquariums
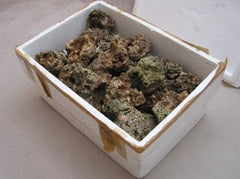 Curing live rock is an important step in setting up a new reef tank. The term "curing" refers to the process of naturally removing dead organisms from the live rock. This helps to ensure that you do not encounter ammonia, nitrite spikes when cycling a new tank, which can be lethal to your fish and corals. When you purchase live rock, it typically comes in a styrofoam box, and has not been touched since it was pulled from the ocean. This means there will be dead or dying organisms in and on the rock. You want to remove them so they do not pollute your tank. One of the most frequently asked questions by new reef tank aquarium owners is "How Do I Cure Live Rock"? There are two basic methods to accomplishing this, either cure the live rock in or out of your main display tank, and we'll cover both.
 The Best Method For Curing Live Rock:
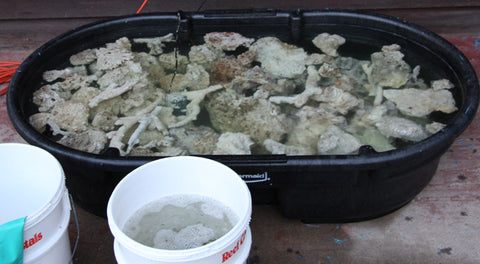
This is without a doubt the best way to cure your live rock. Curing live rock can take about 4 weeks to ensure complete removal of dead organisms. Setting up a separate tank, tub or new plastic garbage bin that is dedicated to cycling live rock only, helps prevent your main tank from re-cycling if it has already been cycled. Fill the tub with salt water, add a power head pump for circulation, and a protein skimmer to remove dissolved organic waste. To help the curing process, scrub the live rock with a plastic brush to remove any dead organisms from the surface of the rock before adding it to the curing tank. Now you wait for about a month for nature to take it's course, all the while be sure to empty the protein skimmer collection cup as needed. After a month has passed, test the water in the curing tank. Your Ammonia and Nitrite readings should be ZERO. Also, the live rock should not smell like dead sea sludge anymore. Once all these conditions are present, your live rock is cured and ready to be added to your main display tank.
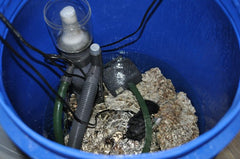
 Curing Live Rock In A Display Tank:
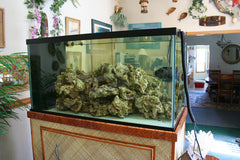
Another way to cure live rock if you do not have the means to set up a dedicated curing station, is to simply cure it directly in your display tank. Here's how to to do. If the tank is already set up and running, you should first unplug all running pumps, heaters, protein skimmers and other equipment that may get in the way. Also, be sure to unplug the lights and leave them off during the curing process, this will help prevent any unwanted or nuisance algae growth. Next, remove about half of the saltwater in the tank, and reserve it in a separate bin to be added back to the tank later. You need to do this because adding the uncured live rock will displace the water in the tank, thus raising the water level. Cut and place a piece of plastic egg crate on the bottom of the tank to protect the glass from falling or shifting rocks. Now you will want to pre-clean the rocks by scrubbing them in a separate tub with some of the reserve saltwater that was removed from the tank. This will help speed up the curing process by removing dead organisms from the surface of the rocks. Next you will turn on the protein skimmer, pumps and heaters to get water circulation going, increase oxygen and temperature. Now you will wait for about a month while nature to take it's course, all the while be sure to empty the protein skimmer collection cup as needed. After a month has passed, test the water in the curing tank. Your Ammonia and Nitrite readings should be ZERO. Also, the live rock should not smell like dead sea sludge anymore. Once the curing is complete, be sure to siphon off the detritus and dead organisms from the bottom of your tank, and perform a substantial water change.